Even the slightest loss of cooling capacity in your walk-in cooler puts your food supplies at risk of spoilage, compromises food safety standards, and, most importantly, affects your revenue. Regardless of the type of establishment where your walk-in cooler is located, you should know how to quickly identify and resolve the smallest cooling issues. This will help you save thousands of dollars by preventing food spoilage and avoiding emergency repair bills.
Our technical specialists compiled this guide in order to help you troubleshoot your walk-in cooler. It covers the most common causes of cooling failures, step-by-step instructions for diagnosing them, and recommendations for regular maintenance. Read on to diagnose the problem and determine whether you can fix it yourself or need to call a professional immediately.
What Should the Temperature Inside a Walk-In Cooler Be?
Before beginning troubleshooting the walk-in cooler, you need to be certain that it is actually operating outside the normal temperature range. Knowing this will greatly simplify the diagnostic process.
- Normal walk-in cooler temperature range: 35°F to 41°F
Under the FDA Food Code, Section 3-501.16, all Time/Temperature Control for Safety (TCS) foods (including dairy, raw proteins, cooked foods, and cut produce) must be kept at 41°F (5°C) or below during cold storage. Running your cooler at 35°F-38°F gives you a compliance buffer against door traffic, defrost cycles, and unexpected load fluctuations.
- Normal walk-in freezer temperature range: -10°F to 0°F
Temperatures slightly above zero degrees Fahrenheit are sufficient to prevent bacterial growth and preserve perishable foods. The standard walk-in cooler temperature in restaurants and grocery stores is 35-38°F.
In addition to temperature, humidity is also important. It is often overlooked, but it can significantly affect product quality and equipment performance.
- The ideal humidity inside a refrigeration compartment is between 50% and 60%.
Too high a humidity level accelerates frost buildup and promotes mold growth, while too low a level can cause food to dry out, shorten shelf life, and lead to premature cracking of door gaskets. If temperature or humidity readings fall outside the ranges we’ve specified, it’s time to start troubleshooting.
Warning Signs That Your Walk-In Cooler Is Struggling
Before a walk-in cooler breaks down, it will almost certainly show some unusual, barely noticeable signs that may indicate a condition leading to a breakdown. You may often overlook these signs without monitoring the unit, or you may notice them but not know what to do. Here is a list of the most common warning signs and what they mean:
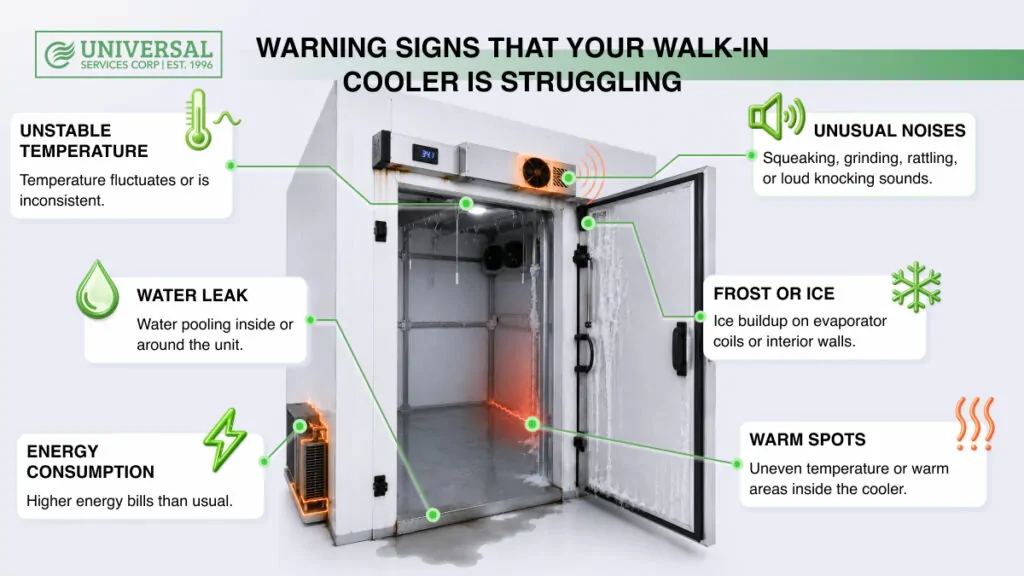
Unstable temperature: If the refrigerator’s thermometer fluctuates unusually or the temperature inside the compartment constantly fluctuates between cold and warm, this is a clear sign that repairs are needed.
Unusual noises: Sounds such as squeaking, grinding, rattling, or loud knocking usually indicate a broken fan blade, a damaged motor bearing, or a compressor overload.
Water leak: If water has leaked inside the system, this is often a sign of a clogged drain tube or a malfunction in the defrost system.
Frost or a thick layer of ice on the evaporator coils: Such ice buildup is a clear sign that the defrost cycle is not working properly.
Sudden increase in energy consumption: If the power consumption of your walk-in cooler has risen significantly, it means your system is having to work harder to maintain the temperature, most likely due to a malfunction.
Warm spots inside the refrigerator: Uneven temperature distribution throughout the system usually indicates obstructions in the airflow.
If you’ve spotted these signs in time, you’ve already prevented a costly breakdown. They can no longer be ignored. Some of these signs can be easily resolved by you, while others require professional intervention before the problem worsens. We’ll discuss this further below.
Check List of Walk-In Cooler Malfunctions, Their Causes, and Solutions
Before we examine each fault in detail, we’ve created a quick checklist for you. That way, you can use it to identify your fault signal, its cause, and what to do about it. This will let you know right away whether you can fix the problem on your own or if you shouldn’t waste time and should call the experts right away.
| Symptom | Cause | Recommended Action |
| Unit not cooling | Thermostat malfunction | Test the thermostat; consider upgrading to an electronic controller |
| Frost on evaporator coils | Defrost cycle failure | Inspect defrost timer, heater, and thermostat |
| Uneven temperature | Airflow obstruction | Reorganize products; clear fans and vents |
| Squealing or grinding noise | Fan blade or motor damage | Inspect fan blades; replace if damaged |
| Water leaks inside the unit | Blocked drain or defrost failure | Clear drain line; inspect defrost components |
| Door area warm or icy | Gasket or hinge failure | Inspect and replace door seal; adjust hinges |
| Sudden rise in energy bills | Dirty coils or compressor strain | Clean condenser coils; schedule technician inspection |
| Freezer not reaching the set temperature | Compressor or refrigerant issue | Call a certified HVAC/R technician |
| Freezing up | Thermostat set too low or defrost issue | Adjust thermostat setting; inspect defrost system |
Now that we’ve briefly discussed these signs, we can move on to the most detailed instructions for each of the malfunctions mentioned above.
Walk-In Cooler Troubleshooting: Solving Common Failures
Let’s move on to a detailed analysis of the 7 most common problems that cause a walk-in cooler to not cool properly. Our technical specialists have shared their expertise and provided instructions on how to resolve minor malfunctions without calling in a technician.
1. Thermostat Malfunctions
The walk-in cooler thermostat is the control center of the entire refrigeration system. As soon as it begins to misread the temperature or fails to properly control the compressor, the entire system collapses. Problems most often arise with older mechanical thermostats. These are the most prone to calibration errors and physical malfunctions.
To check for a malfunction: turn the dial to the lowest setting and listen for a clicking sound. With a working thermostat, you’ll hear clicking. If you don’t hear anything, the thermostat likely needs to be replaced.
How to fix the problem: you can replace the thermostat with a compatible one, as specified in the manual for your walk-in cooler. If it is working properly, calibrate it by comparing the thermostat’s reading with that of an independent thermometer and adjusting the scale accordingly.
If your walk-in cooler uses a mechanical thermostat, we strongly recommend switching to an electronic one. Electronic thermostats are more accurate, reliable, and easier to monitor. The main advantages of monitoring include real-time error code display, as well as the ability to receive notification before minor issues escalate into system failures.
💡Some advanced systems also support an on-demand defrost function. This feature initiates a defrost cycle only when sensors detect ice buildup, reducing energy consumption by as much as 27%.
2. Defrost Cycle Failure
The most common cause of this failure is ice buildup on the evaporator heat exchangers. Although the defrost cycle is designed to regularly remove this ice, if it fails, frost accumulates until the heat exchangers become insulated. The ice insulates them to such an extent that the heat exchangers stop absorbing heat from the air inside the unit.
To check for a malfunction: make sure the defrost timer is working properly. Inspect the defrost heater for visible damage. Use a multimeter to check the conductivity of the defrost thermostat.
If you are unsure how to perform these checks correctly, it is best to call a service technician. These components require technical knowledge. Improper handling of defrost system components can cause further damage or even pose a safety hazard.
How to fix the problem: once you have identified the faulty component, replace it with a manufacturer-approved replacement part. Reset the defrost timer to the cycle frequency recommended in the owner’s manual. After the repair, monitor the operation of the evaporator heat exchangers to ensure that ice is being removed properly.
3. Clogged Condenser Heat Exchangers
The condenser heat exchanger transfers heat from the refrigerant to the surrounding air. If left uncleaned for weeks, it becomes covered with dust, grease, or debris, losing its ability to effectively dissipate this heat. When clogged, it works harder to perform its function, which leads to overheating.
To check for a malfunction: it is easy to tell if the heat exchanger is struggling; simply check how clogged it is.
How to fix the problem: using a heat exchanger brush with soft bristles or a vacuum cleaner with a brush attachment, carefully remove debris from the heat exchanger fins. Then wipe them down with a damp cloth. Perform a deep cleaning at least twice a year.
4. Dirty Condenser Fan Blades
A squeaking or knocking noise from the walk-in cooler is caused by problems with the fan blades. Dust-covered or damaged blades reduce airflow and place an additional load on the fan motor.
To check for a malfunction: this is pretty straightforward, check the blades for dust and overall condition.
How to fix the problem: if the condenser fan blades are too dusty, simply clean them; if they are broken or damaged, call a professional to replace them.
5. Damaged Door Seals and Hinges
A worn-out door seal is one of the main causes of temperature loss in refrigerators, and one often overlooked. Even a small gap in the seal allows warm, humid air to continuously enter the walk-in cooler. Such airflow forces the refrigeration system to compensate, leading to ice buildup around the door frame.
To check for a malfunction: run your hand along the perimeter of the closed door while the walk-in is running. Look for air leaks or drafts. Visually inspect the gasket for signs of damage or hardening.
Also check the door hinges and latches. A door that doesn’t close properly is just as much of a problem as a damaged door gasket.
How to fix the problem: Adjust or replace any door parts that show signs of wear. Replacement parts for refrigerator doors are widely available and significantly cheaper than the energy and food losses caused over time by a faulty gasket.
6. Obstacles to Air Circulation
It is important to arrange the products properly inside to ensure proper cooling. Stacking or improper placement of products leads to the formation of warm spots in the cooler, even when the refrigeration system itself is working flawlessly.
How to fix the problem: do not place products right up against the walls, press them against the fans, or stack them too high. Fill the shelves no more than 90% full. Always leave space between the products and the interior walls. Do not block the evaporator fans, air return vents, or exhaust grilles. Position the shelves to ensure air circulation from top to bottom and from side to side.
It is important to train staff on these loading rules. We’ll discuss training staff on the specifics of handling a walk-in cooler in more detail further on.
7. Problems with the Compressor of the Walk-In Cooler
If you haven’t found any issues with any of the above situations, the problem may be with the compressor. The compressor is the most complex and most expensive component of the refrigeration system.
To check for a malfunction: an obvious sign may be that the compressor doesn’t start at all. If it does start, listen for loud knocking or rattling noises while it’s running.
How to fix the problem: you cannot replace the compressor yourself; you’ll need to call a technician. The compressor itself for a walk-in cooler costs between $200 and over $700, not including labor. To prevent damage to this most expensive component, your walk-in cooler requires regular maintenance and cleaning to avoid costly breakdowns and extend its service life.
Situations That Require Calling a Specialist
The most important thing that owners of walk-in coolers need to understand is that not all repairs can be carried out without a technical specialist. Recognizing this fact early on will minimize downtime caused by breakdowns, protect the system from even worse damage, and save you money by reducing downtime, preventing product spoilage, and avoiding wasteful spending on low-quality repairs.
In case of a major breakdown or if you’re unsure about performing repairs yourself, you can call Universal Services Corp. Our company has been providing HVAC and refrigeration services throughout the New York area for nearly 30 years. By contacting us, you’ll find a solution for any request, whether it’s urgent, regular, or outside of business hours.
Feel free to call the certified HVAC/R specialists at Universal Services Corp. right away if:
- You’ve followed most of the steps we mentioned, but the unit still isn’t cooling.
- The compressor won’t start or is making loud mechanical noises.
- The defrost system components are damaged, and you’re unsure how to inspect or replace them.
- Your electricity bills have suddenly increased for no apparent reason.
Staff Training on Operating a Walk-In Cooler
It is important to provide your staff with at least basic instructions on handling the walk-in cooler so that they do not block airflow or interfere with the system’s operation. Provide employees who work with the walk-in cooler with:
- Instructions on loading goods, specifying where items should and should not be placed, and why.
- Cleaning responsibilities, specifying who is responsible for what, how often, and which approved cleaning products to use.
- Early warning signs, helping staff understand what certain frost patterns, condensation on doors, or unusual noises actually mean.
This knowledge, combined with responsible use of the walk-in cooler, will help you avoid costly breakdowns and extend its service life without any issues.
Final Thoughts
When your walk-in cooler isn’t cooling, it’s a sign that a breakdown is either coming or has already happened. Don’t ignore these early warning signs, as they can lead not only to spoiled food but also to costly repairs. Taking action in time can save you from having to replace a compressor that costs over $700, or something even worse.
Make sure your walk-in cooler isn’t getting hot, making strange noises, or simply working as it should. If you do notice any of these signs, follow our walk-in cooler troubleshooting guide or take advantage of our guaranteed-quality service by contacting the Universal Services Corp. team.
Frequently Asked Questions
How do I know if my walk-in cooler is low on refrigerant?
The refrigerant level is determined by technical specialists and measuring devices. Signs that there is insufficient refrigerant include failure to reach the set temperature during continuous operation, a warm suction line or the absence of frost on it, and oily stains around the refrigerant pipe connections. Refrigerant does not run out without a leak.
My walk-in cooler is making a loud noise, what does it mean?
A humming sound is a normal indication that the compressor is working; a grinding noise usually indicates a faulty fan motor bearing; a loud knocking sound during startup often indicates a problem with the compressor; a rumbling sound may mean that the fan blade has become loose or that the panel is vibrating.
How long should it take a walk-in cooler to cool down after loading?
A properly functioning walk-in cooler should return to the set temperature within 30-60 minutes, provided the door is closed.
Can I reset a walk-in cooler to fix a cooling problem?
Restarting rarely solves significant problems, but it can postpone them. Some electronic control systems have a restart function that allows you to clear minor error codes. You can reset the device by following the instructions in its manual. For systems without electronic controllers, you can turn the system off for 5 minutes and then turn it back on. This may reduce the load on the compressor.