Mini-split systems are increasingly popular in homes and small businesses due to their energy efficiency, compact design, and ductless operation. At the same time, interest in DIY installation is growing: DIY kits, video tutorials, and step-by-step guides are appearing on the market, giving the impression that installation can be handled without involving HVAC professionals.
However, the decision to install the system yourself carries different implications depending on the context. For residential spaces, it is a matter of technical complexity and personal responsibility. For commercial properties, compliance requirements, safety standards, and insurance coverage come into play. In this article, we will explore when DIY installation is truly justified and when professional installation is the smarter and safer choice.
Can You Install a Mini Split Yourself?
There is no clear-cut answer to the question of whether one can install a mini-split system on one’s own. It is technically possible, and in some circumstances, this can be effective. But just because it is possible to do the work does not mean that the outcome will be predictable or satisfactory in all situations.
There are several factors that contribute to the success of a DIY installation. The final result depends on several key factors, including:
- Type of system being installed;
- Complexity of configuration;
- Length and layout of the refrigerant lines;
- Specific conditions of the space;
- Level of technical expertise.
The acceptable solution for a single-zone system in a home environment can be quite different and more hazardous in a multi-zone or commercial system.
So, it is possible to install a mini-split system on your own, but whether you should do so depends on your specific situation. Before deciding on a DIY installation or a professional installation, it is important to objectively assess these factors.
DIY mini split vs Standard Systems: What’s the Difference?
The key difference between a DIY mini split and a standard system lies in the installation process and the level of technical work required.
DIY mini split systems are typically designed to simplify the process for homeowners. They often come with pre-charged refrigerant lines and factory-sealed quick-connect fittings, which limit the need to open and service the refrigeration circuit. These systems are often marketed as a DIY ductless mini-split solution for simple residential applications. Because of this design, the installer usually avoids cutting and flaring copper lines or performing a full system evacuation. These kits are intended for straightforward layouts, most commonly single-zone applications.
Standard mini-split systems are installed with full access to the refrigeration circuit. The installer must measure, cut, flare, torque, evacuate, and verify the system before startup. This approach provides more flexibility in routing and configuration, especially for longer line sets or multi-zone installations, but it requires specialized tools and technical experience.
To better understand how these systems differ in practice, it helps to compare their technical characteristics side by side. The table below highlights the installation and structural differences that most often determine whether a DIY approach is realistic.
| Feature | DIY Mini Split | Standard Mini Split |
| Refrigerant lines | Pre-charged, sealed quick-connect lines | Field-cut and flared copper lines |
| Refrigeration circuit access | Limited, factory-controlled | Fully opened and configured on site |
| Vacuuming requirement | Often not required (sealed system) | Mandatory before startup |
| Required tools | Basic installation tools in most cases | Vacuum pump, manifold gauges, torque wrench |
| Installation flexibility | Limited to predefined layouts | Flexible routing and custom configurations |
| Typical use case | Simple single-zone setups | Multi-zone or complex installations |
In other words, the key difference lies not only in “convenience” but in the technical complexity of the installation. DIY solutions have become more popular thanks to ready-made kits, but full-fledged systems with a traditional installation layout still require a professional approach, especially when it comes to longer runs or multi-zone configurations.
It is often the type of system that determines whether a mini split installation DIY is a realistic option or a potential mistake.
Mini Split Installation DIY: What the Process Actually Involves
Installing a mini-split system may look straightforward in videos, but in practice, each stage directly affects system performance and long-term reliability. The indoor unit, the line set, the wiring, the drain, and the outdoor unit all have to work together. If one part is installed incorrectly, it usually affects performance, reliability, or both. Below is what the installation typically includes:
Step 1: Mount the Indoor Unit
Secure the mounting bracket to the wall using proper anchors and ensure it is level. The position must allow unobstructed airflow, safe service access, and a practical exit point for the line set through the wall. Once aligned correctly, attach the indoor unit according to the manufacturer’s instructions.
Step 2: Drill the Wall Opening and Route the Line Set
Drill an appropriately sized wall penetration for the bundled connections. The bundle typically includes refrigerant copper lines, control wiring, and the condensate drain. Route the lines carefully to avoid sharp bends and mechanical stress, and ensure the exterior section is protected if required.
Step 3: Install and Secure the Outdoor Unit
Place the condenser on a stable and level surface, such as a mounting pad or wall brackets. Maintain proper clearance around the unit to ensure airflow. Install a service disconnect nearby as required by code so the system can be safely shut off during maintenance.
Step 4: Connect Refrigerant Lines, Drain, and Electrical
Connect the refrigerant lines according to the torque and sealing specifications provided by the manufacturer. The drain line must be routed with a consistent downward slope to prevent water backup. Electrical connections must comply with both the manufacturer’s instructions and applicable local codes.
Step 5: Prepare the Refrigeration Circuit and Start the System
Before startup, the refrigeration circuit must be properly prepared in accordance with technical standards. Once ready, power on the system and verify stable operation, checking for proper cooling or heating performance and ensuring there are no abnormal vibrations or system faults.
The key point is that these stages do not exist in isolation from one another. It is an interconnected system in which every connection, every angle, and every contact matters. A mistake at any stage is not isolated, as it affects the overall result, performance, and durability of the equipment.
Mini Split DIY Installation: Where It Works and Where It Breaks Down
Depending on the type of system you are installing, it is possible to install a mini-split system yourself, albeit more difficult when the demand for the system rises. It’s mostly about the setup, wiring, and accuracy that’s needed.
A single-zone system with relatively short line runs that have easy access and minimal electrical modification is a good fit for DIY installation. In such instances, the installation process is predictable and manageable.
But the complexity escalates rapidly with multi-zone configurations, long or hidden line sets, structural restrictions, and electrical and refrigerant requirements. Once these factors are added to the mix, the chances of error become a slim margin, and errors could impact performance, efficiency, or even warranty coverage.
That is, it is not a question of whether it is feasible, but whether the project conditions maintain an acceptable level of technical risk.
When Can a Self-Install Mini Split Be a Practical Option?
DIY makes the most sense in simple, manageable setups. Most often, these include:
- Simple single-zone systems
One indoor unit connected to a single outdoor unit.
- Short and accessible line runs
No complex routing through ceilings, structural elements, or multiple levels.
- DIY-ready kits
Systems with pre-charged lines and simplified connections.
- Basic technical experience
Familiarity with electrical work, proper tool handling, and attention to detail.
In these situations, self-installation can be a practical choice. For small rooms and simple single-zone setups, DIY kits often work well when the installation is done carefully and the manufacturer’s instructions are followed closely.
However, even in simple cases, precision and a clear understanding of what you are doing remain key. If the system is not installed accurately, issues may not show up immediately, but they often appear over time.
Where Do It Yourself Mini Split Installation Problems Usually Start
Most problems with DIY installation don’t arise during the mounting of the units, but rather in technical details that are easy to overlook. On the surface, installing the indoor and outdoor units seems like the most difficult part, but in practice, serious mistakes are more often related to connections, piping, and circuit preparation. The following scenarios typically pose the greatest challenges for DIY projects:
- Multi-zone configurations
When a single outdoor unit is connected to multiple indoor units, the number of refrigerant lines and connections increases, which complicates the installation, load balancing, and configuration of the units to operate in different modes. In such cases, it is not only the installation that matters, but also ensuring that everything works in harmony.
- Long or complex refrigerant line runs
The longer the line, the more critical it is to ensure precise connections, proper insulation, and compliance with the manufacturer’s requirements regarding length and elevation differences. Even minor deviations can affect performance and operational stability.
- Complex electrical connections
A mini-split often requires a separate power line, the correct selection of a circuit breaker, and proper connection in accordance with standards. Errors at this stage not only affect the operation of the equipment but also pose real safety risks.
- Lack of specialized HVAC tools
Without a vacuum pump, pressure gauge, manifold, and torque wrench, it is difficult to ensure the tightness of connections and properly prepare the circuit for startup.
The bottom line is simple: in DIY projects, it’s not the visible installation steps that most often go wrong, but the hidden technical details that require precision, the right tools, and an understanding of how the refrigeration circuit works. These are precisely the factors that most often lead to a loss of efficiency or premature operational issues.
The Real Risks and Limitations of Mini Split DIY Installation
Installing a mini-split system on your own may seem like a way to save on labor costs, but the risks are often underestimated. It is not a question of minor inaccuracies, but of factors that directly impact the efficiency, durability, and safety of the equipment. The most common risks include:
- Reduced performance and higher energy costs
Improperly sealed connections or incorrectly routed lines reduce system efficiency. The unit may take longer to reach the desired temperature, operate more frequently, and increase electricity usage. - Refrigerant leaks and compressor stress
Even small refrigerant losses affect system pressure and increase the load on the compressor. Over time, this can shorten equipment lifespan or damage critical components. - Electrical safety concerns
Incorrect breaker sizing or wiring mistakes may cause unstable operation, overheating, or safety hazards. Mini-split systems require proper electrical configuration, not guesswork. - Warranty and regulatory limitations
Some manufacturers require professional installation to maintain full warranty coverage. In the United States, refrigerant handling is regulated under the Clean Air Act, and technicians must hold EPA Section 608 certification for installation, maintenance, and repair involving refrigerants.
The bottom line is that although it may appear to be less expensive to do it yourself, one wrong move can easily cancel out the savings. The cost of recharging the system, repairing or replacing the compressor can be much more expensive than professional installation.
Why Vacuuming the System Is Critical
It is worth paying special attention to the vacuuming process, as this is a critical step in preparing a mini-split system for startup. It should not be viewed as an extra “just-in-case” step, since the operation of the refrigeration circuit directly depends on the quality of the vacuuming.
During installation, air and moisture inevitably enter the system. If they are not properly removed, several problems can occur:
- Acid formation inside the circuit.
Moisture reacts with refrigerant and oil, potentially creating acids that damage internal components over time. - Incorrect operating pressure
Air inside the lines alters system pressure, reducing cooling efficiency and stressing mechanical parts. - Reduced heat exchange efficiency
Contaminants interfere with proper refrigerant flow and thermal performance. - Increased compressor load
The compressor works harder under contaminated conditions, which shortens its service life and increases the risk of early failure.
For this reason, improper or skipped vacuuming is one of the most common causes of premature issues in DIY mini-split installations. The step may appear minor, but it has long-term consequences for system durability and reliability.
Professional Installation: What You’re Paying For
Professional installation ensures compliance with the manufacturer’s technical requirements and applicable standards. This helps preserve warranty coverage and reduces the risk of legal or insurance complications in the future. In essence, you are paying not only for the installation but also for the expected result, free from unnecessary rework and risks. Professional installation typically includes:
- Accurate system selection
Specialists assess square footage, ceiling height, insulation level, window exposure, building orientation, and climate conditions to choose equipment that will operate efficiently and reliably.
- Precise installation and sealed connections
Licensed installers use specialized tools, follow proper torque specifications, and check for refrigerant leaks to protect long-term system performance.
- Pre-commissioning testing
After installation, the system is tested under load to verify operating pressures, temperatures, and overall functionality before regular use.
- Warranty protection
Many manufacturers require installation by a licensed professional for full warranty coverage. DIY installation may limit or void those protections.
That is why many homeowners and business owners choose professional installation from Universal Services Corp. Our professional team handles system selection, route planning, installation, and equipment testing to ensure reliable performance right from the start.
Why Proper Mini-Split Sizing and Selection Matter
Proper installation begins long before the system is mounted on the wall. The success of a mini-split project depends on choosing the right system configuration for the space. Size, type, placement, and energy efficiency all influence how the system will perform over time. The image below highlights four core factors that directly impact both comfort and long-term operating costs.
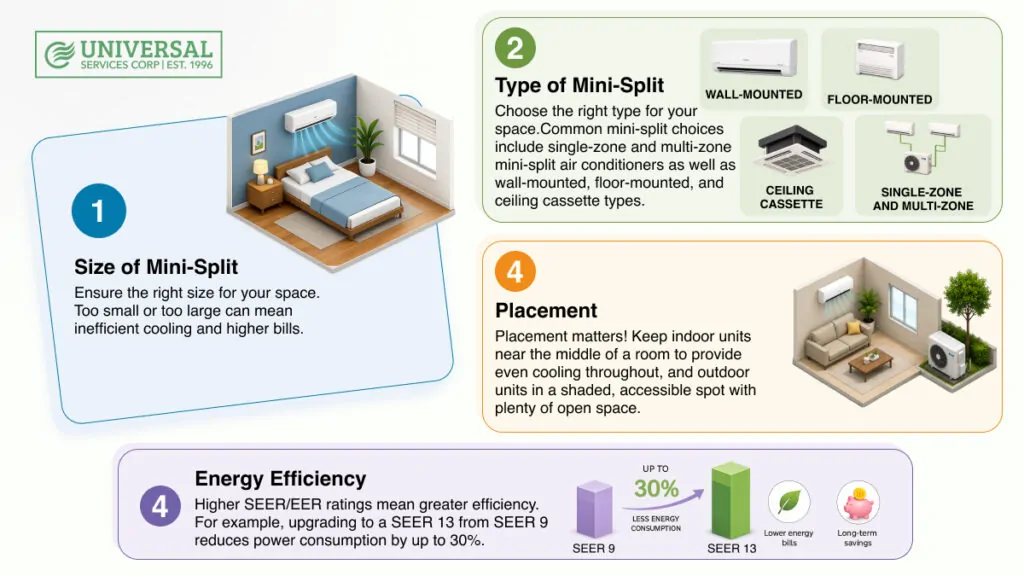
One of the main reasons a professional approach is often more successful is the proper sizing of the system. Capacity must match not only the square footage but also insulation quality, window exposure, ceiling height, and local climate conditions.
If the system is too small, it will not be able to effectively cool or heat the space. The equipment will be operating around the clock, attempting to achieve the desired temperature, increasing wear and tear, and electricity usage.
If the system is too powerful, short cycling occurs (frequent on-off cycles). This decreases efficiency, affects humidity control, and also shortens the compressor’s life.
Energy efficiency ratings such as SEER and EER determine how much electricity the system will consume over time. While higher-efficiency models may cost more upfront, they often reduce operating costs in the long run.
Experts consider the square footage of the room, insulation, exterior walls, climate zone, and more. These are the things that are often missed in a mini split installation DIY approach, resulting in a less stable system performance in the long run.
Mini Split DIY vs Professional Installation: Cost Comparison
Before deciding between a DIY installation and a professional one, it’s helpful to consider not only the starting price but also what exactly is included in each option. The table below highlights the key differences that most often affect the total cost, time, and predictability of the outcome.
| Factor | DIY Installation | Professional Installation |
| Upfront cost | Typically lower, especially for simple single-zone DIY-ready kits. | Higher, but includes most of the labor and inspections. |
| Tools & equipment | You may need to purchase or rent HVAC tools (depending on the system). | Tools and equipment are included in the service. |
| Time investment | More time is required for planning, installation, and inspections. | Minimal time required from the homeowner. |
| Risk of mistakes | High, most often due to connections, routing, and circuit preparation. | Low, thanks to experience and quality checks. |
| Rework/troubleshooting | This often becomes an additional expense if something needs to be redone. | Less rework is usually required; problems are more often caught during commissioning. |
With a DIY approach, you save on labor costs, but you take full responsibility for the outcome. Professional installation costs more upfront, but it includes expertise, tools, testing, and a warranty.
Should You Install a Mini Split Yourself or Hire a Professional?
The choice between DIY and professional installation depends less on your budget than on the specific conditions of your project. If you’re dealing with a simple single-zone system with short, easily accessible runs and you have basic technical skills and the necessary tools, DIY can be a sensible option. In such cases, the work typically involves straightforward technical tasks.
However, in many situations, professional installation is a more reliable solution and often more cost-effective in the long run. Multi-zone configurations, long or concealed runs, and requirements for precise vacuuming and proper startup increase the likelihood of errors during a DIY installation. Even minor flaws in connections or circuit preparation can lead to reduced efficiency, additional repair costs, and the risk of voiding the warranty. In such cases, initial savings often turn into costs for rework or service. However, the decision becomes clearer when you break it down into practical conditions.
DIY may make sense if:
- You are installing a simple single-zone system;
- Line runs are short and easily accessible;
- You are using a DIY-ready kit with pre-charged lines;
- You have basic technical experience and proper tools.
Professional installation is the better choice if:
- The system is multi-zone or requires custom configuration;
- Line runs are long, concealed, or structurally complex;
- Precise vacuuming and system preparation are critical;
- Warranty protection and code compliance are important;
- You want predictable performance without rework risk.
If you want reliable results without unnecessary risks, our team will be happy to assist with Mini Split System Installation, as well as ongoing HVAC Maintenance, to ensure the system operates reliably and efficiently throughout the season.
Conclusion
While installing a mini-split yourself is possible in simple setups, increased system complexity significantly raises the risk of performance issues, added costs, and potential warranty concerns.
Professional installation typically yields more predictable results and often proves more cost-effective in the long run, as it reduces the likelihood of rework and technical failures after launch. If it’s important to get everything right the first time and avoid unnecessary risks, it makes sense to bring in experienced professionals in such situations, and this is exactly what our Universal Services Corp. team focuses on when working with mini-split systems.
FAQ
Is it possible to install a mini-split system on your own?
Yes, it is possible in certain situations, especially when dealing with a simple single-zone system and a straightforward piping layout. However, the outcome depends heavily on the type of equipment, installation conditions, the availability of tools, and your experience. If the project is more complex, professional installation usually yields a more predictable result and reduces the likelihood of having to redo the work.
How hard is it to install a mini-split system?
The difficulty depends on the configuration. In simple cases, installation can be straightforward, but “complexity” usually arises with connections, piping, electrical work, and preparing the refrigerant circuit for startup. It is these stages that most often determine whether the system will operate reliably.
Are mini-splits really “easy” to install?
They may seem simple due to their compact units and accessible instructions, but the actual ease of installation depends on the conditions. If access is difficult, the run is long, or precise technical operations are required, the installation quickly ceases to be “easy.” Therefore, it is better to assess not the outward appearance of the process, but the actual requirements of your site.
Why is vacuuming so important?
Because the operation of the refrigeration circuit directly depends on it. If air and moisture remain in the system, this affects the pressure, heat exchange efficiency, and the load on the compressor. Skipping or improper vacuuming is one of the most common causes of problems after a DIY installation.
Do I need a permit to install a mini-split air conditioner?
It depends on the city, the type of building, and the nature of the work being performed (especially if electrical work is involved or there are specific requirements for the outdoor unit). For commercial properties, issues regarding permits and compliance with regulations are typically more stringent than for residential ones. If in doubt, it’s best to clarify the requirements for your property before starting the work.
What happens if you install a mini-split system without a permit when one is required?
In the worst-case scenario, this could lead to problems during inspections, when selling the property, or with insurance coverage, especially for businesses. Even if the system works fine, legal consequences may surface later, so it’s best to sort out the requirements from the start.
Does professional installation help avoid unnecessary costs in the future?
This is often the case. Professional installation typically reduces the risk of errors that could later result in costs for rework, service calls, or the loss of warranty coverage. That’s why, for more complex setups, a professional approach may end up being cheaper in the long run, even if the initial price is higher.